Brewery Tour- Overview
Welcome to the start of the brewery tour.
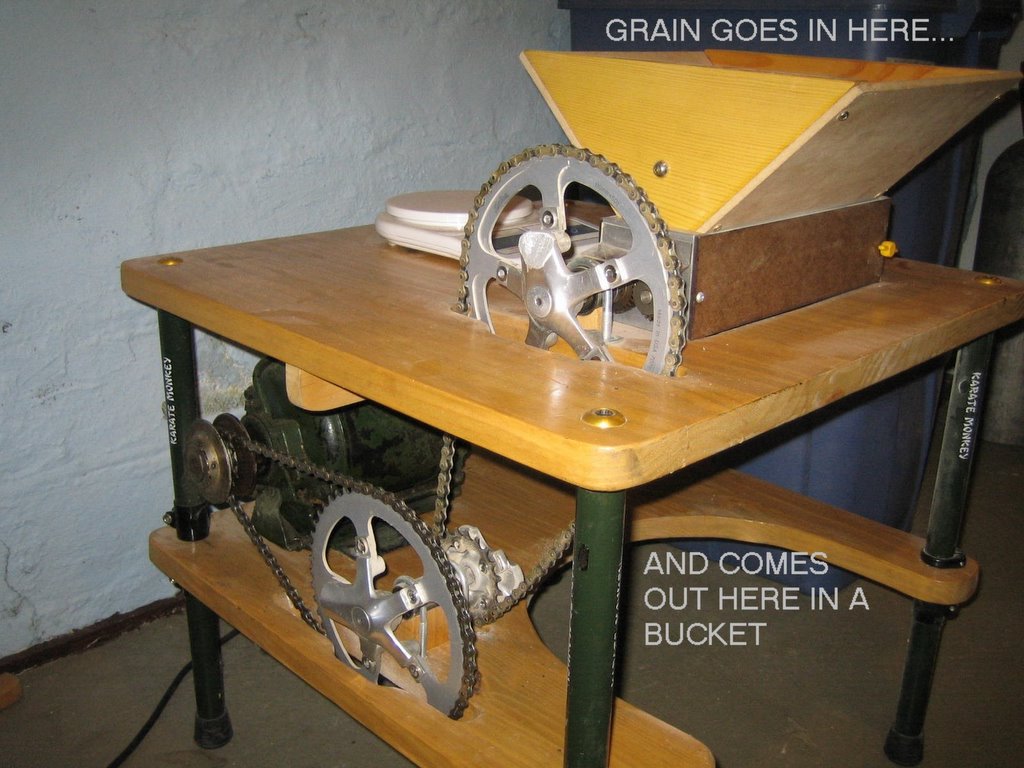
A day of brewing usually begins by crushing the grain. Pictured below is the grain mill that is used to crack open the malted barley kernels. Proper cracking is essential for hot water to penetrate and extract the starches inside. Also, the outer husk acts as a filter in the 2nd brewing kettle, which I'll get into later. This grain mill was made with alot of recycled bike parts surrounding the Schmidling gear drive roller mill. Notice the legs are actually top tubes from blemished Surly Karate Monkey frames. The clamps holding the legs to the table platforms are Salsa stem clamps leftover from the destructive testing machine. The gold topcaps are Salsa quill stem parts, complete with titanium wedge bolts, oh yeah. The motor was sitting in Dave Gray's office and was brought out of retirement to serve as a brewing component. The motor runs at 1,700 r.p.m. but the optimum mill roller speed is about 200 r.p.m., so I geared it down using chainrings. Life could've been easier if I just used v-belts and sheaves like it was originally intended to run on, but fuck that. It's my brewery and it should look cool. Mounting the chainrings took some sacrificial other bike parts like used cranks and a bottom bracket. The only good use for wax-based chainlubes I've ever seen was for this grain mill, since the wax is alot less dirty and doesn't splatter up the table when in operation. The original grain hopper only held less than 2 pounds of grain at a time, so I built a new one that is twice the capacity. Since the very first day I ran this thing in 2002, it's run like a champ and hasn't needed one adjustment. Rock solid!
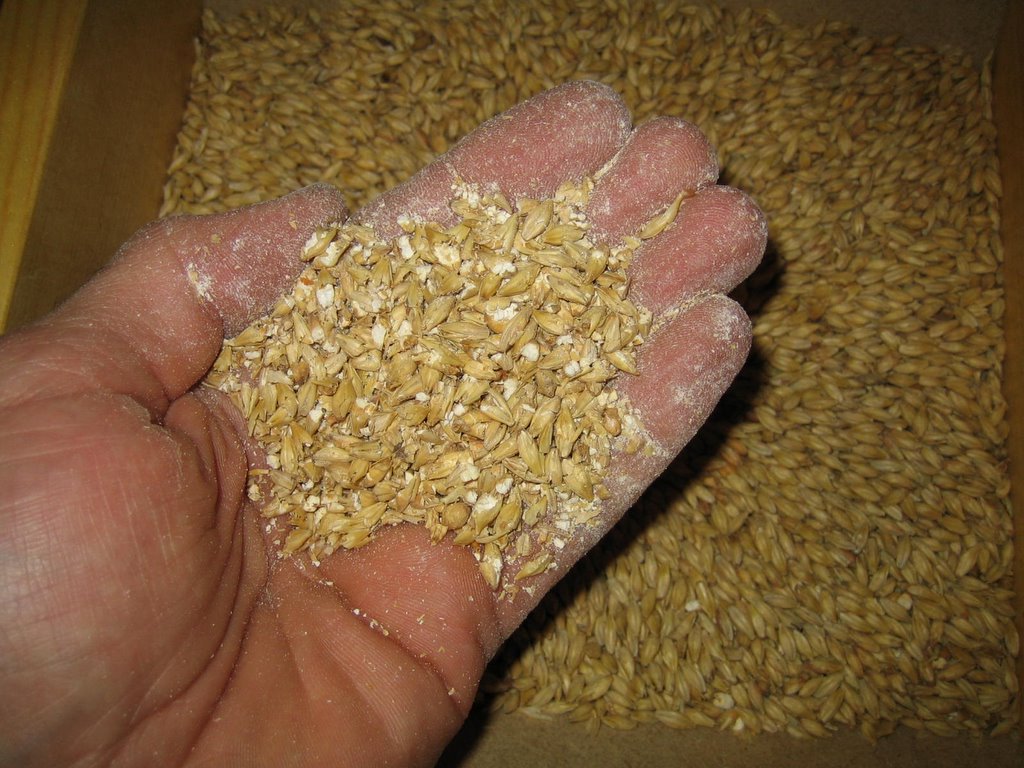
This is what the crushed barley looks like. You can also eat this stuff, as it tastes very much like Grape Nuts cereal.

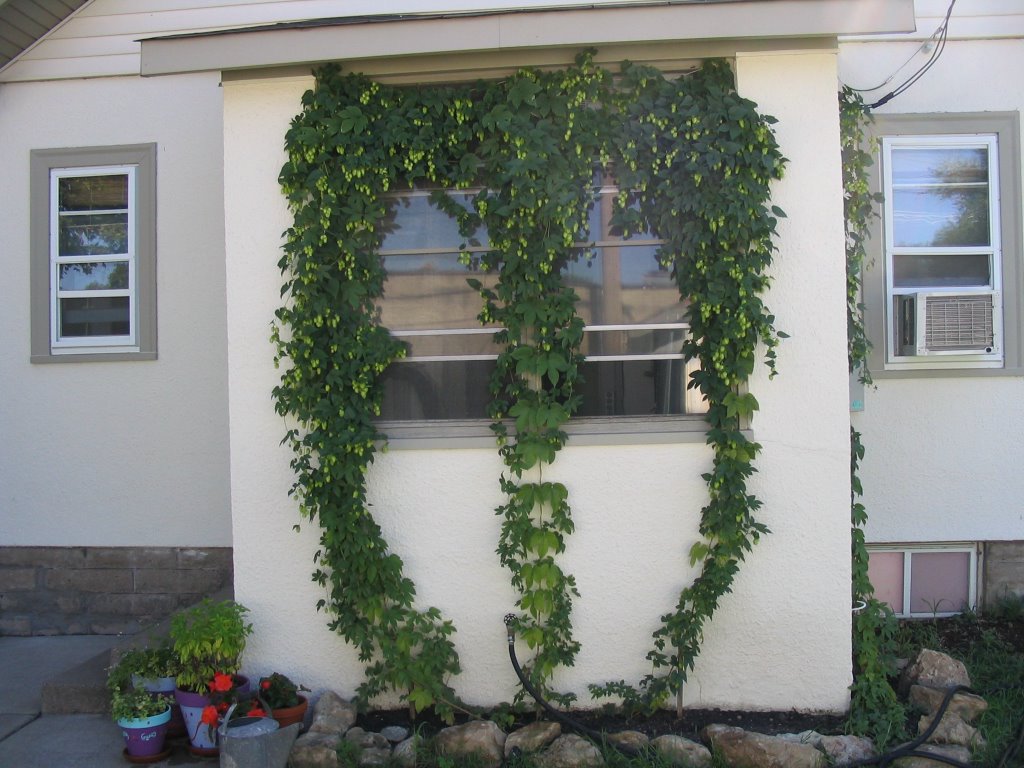
The hop vines growing outside the brewing porch are of the Cascade and Willamette varieties. These had grown for 3 years in the original Swerve Brewery location before being transplanted to the new location in 2004. I have yet to use them in a batch of beer, but they look nice and provide a ton of shade during the summer months.

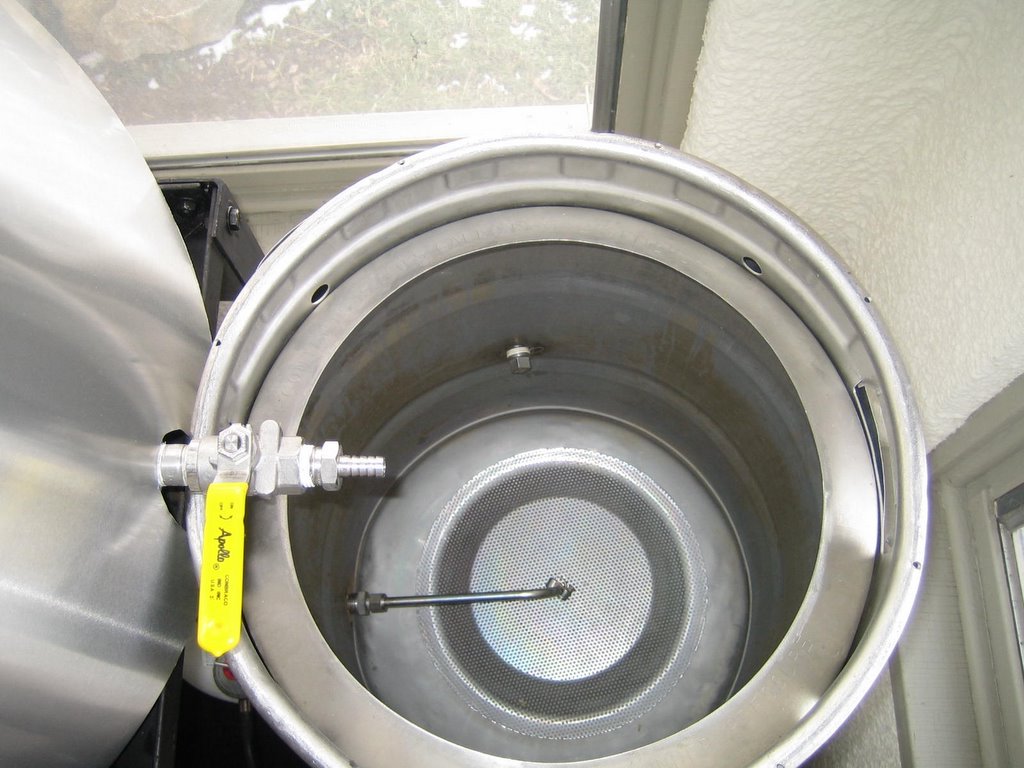
Inside the porch is where the brewing actually takes place. These kettles are used, refurbished and modified 1/2 barrel kegs purchased through Sabco with a 12" diameter hole cut in the top. The kegs actually make for excellent brewing vessels and I have yet to find a reason people spend tons of money on expensive new kettles.
This 3-tier design is very simple since the water flows via gravity, allowing freedom from having to use a pump. I eventually bought a pump to have liquid recirculating options and for speeding up the chilling process.
The upper most kettle is the hot liquor tank (HLT) and it's primary function is to heat the bulk of the water for the system.

The middle kettle is called the mash tun and it's primary uses are to cook the crushed malted barley like you would oatmeal. It is truly the heart of the whole system. The crushed malted barley is poured into specific temperature hot water. At certain temperatures between 120-170 F (48-77 C), the starches in the barley will be converted to sugars, proteins will be broken down and enzymes will be given the green light for fermentation assistance.
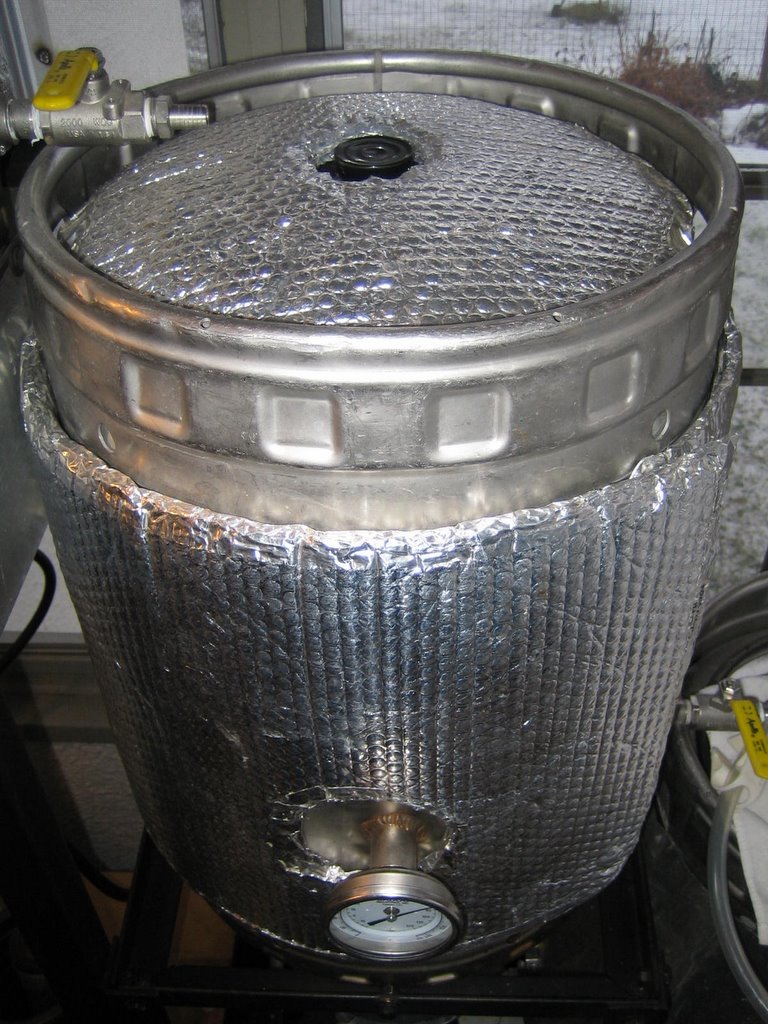
 After the water and/or ingredients in the upper and middle kettles are heated to the proper temperature, they must rest for specific times at these stable temperatures to either break down proteins, convert starches to sugars and a host of other geeky chemical reactions. To aid in temperature stabilization during these rest periods, I wrap the kettles with a heat blanket that is made from foiled covered bubble wrap. It's temp resistant to 180F and does a good job.
Inside these kettles, you'll see a stainless steel screen. This is called a false bottom, because it supports the grain bed and allows the liquid to flow through the bottom and out the pick up tube to be transferred to another kettle. 2 of 4 ingredients are now present, water and malt.

The lowest kettle is the boiling kettle. When the sugary liquids from the mash tun have cooked through their cycle, they are drained here for a 90 minute boil. During the boil is when hops are added, so 3 of the 4 ingredients are now present. The longer hops are boiled, the more bitterness you'll sense. The shorter hops are boiled, the more flavor and aroma you'll taste and smell. Balancing the bitterness to flavor to aroma levels is the hard part. Both the mash tun (middle kettle) and the boil kettle (bottom) have identical false bottoms. This time it's used to hold back the hops when it's time to drain the liquid (now called wort) into the chiller.
It is absolutely necessary to cool the wort (pronounced wert) to optimum temperatures for fermentation to take place. Yeast likes starting temps in the 55-75 F (13-24 C) range and the easiest way for a homebrewer to cool 10 gallons of boiling wort down is with cold water or ice.
The "counterflow" wort chiller consists of a copper tube inside another copper tube. Hot wort flows into the inner tube while cold water flows through the outer tube. The cold water cools the wort down as they bypass eachother flowing in opposite directions. With help from the flow restricted pump and the built in temperature gage, I'm able to get the wort cooled to exactly the temperature desired for the specific yeast strain. This cooling process takes about 15 minutes and sanitation at this point is ultra critical. It takes alot of water to cool beer down, so I have a stainless steel tubing coil dipped in an ice bath (or snow in the winter) between the kitchen sink and the counterflow chiller. This speeds things up and allows less water usage. I also run the hose either back into the upper kettles for cleaning water or outside to the garden for the hops in the summer.

Notice the red oxygen tank inside the chiller, this pumps fresh oxygen back into the cooled wort. Oxygen is boiled out of the wort during the 90 minute boil and adding it back in is necessary for the yeast to have a healthy aerobic start.
The cooled and oxygenated wort is put in a fermenter and the yeast slurry is now pitched. All 4 ingredients in beer are now present, but the most wonderful thing is about to take place, fermentation. Imagine yeast, a fungus, is like a little Pacman. There are literally millions of these Pacmen flowing around, waking up from a nap and looking for something to eat. Simplifying the fermentation process, you could say the Pacmen eat the sugars and afterwards "urinate" alcohol and "fart" CO2. The alcohol stays in the beer while most of the CO2 is released through an escape tube on top of the fermenter. The majority of the fermentation takes place in the first 4-10 days, but the beer (formerly known as wort) must be aged to allow off flavors and smells to vanish, allow the yeast, proteins and gunk to settle to the bottom and for maturation of flavor. Depending on the style of beer made, this secondary fermentation stage can last from weeks to months.
The fermenters used are mainly 5-6.5 gallon glass carboys. The best thing about glass is that you can watch the fermentation activity during the peak of the first week. Have you ever seen a cascading Guinness stout in the glass? The activity of fermenting beer is similar looking, but even more active. When I ask professional brewers what they miss most about their early days of homebrewing, most of them say they miss watching the fermentation activity in the glass carboy.
 I also employ a more modern stainless steel conical shaped fermenter. This thing rocks and makes the cellaring practices many steps easier. With glass carboys, it is necessary to sanitarily transfer the beer off the bottom layer of settled scum after a couple weeks into 2 new carboys in order to clarify the beer. So for a 10 gallon batch, that is 4 carboys that have to be cleaned and sanitized along with all the transfer tubing and small pieces. With the conical, all you do is open up the bottom valve to allow about 1/2 gallon of the settled scum to flow out. This saves at least 45 minutes of time and uses less water and cleaning chemicals. Not to mention, you can easily recycle this scum, which is basically "sleeping" Pacmen and proteins, into another freshly brewed wort batch to wake them up and get a second life out of the yeast. I didn't construct this vessel myself, but I built the legs, attached casters for mobility and cinched them together at the bottom with used chainrings. The height allows for easy transfer of beer directly into the keg.

Fermentation takes place based upon the temperatures in the basement. The cellar ranges from 49-73 F (9-23 C) depending upon the seasons. I try to brew styles that cater to the natural temperatures from season to season. But when I'm craving a Munich Helles and it's July, there is also the massive chest freezer that's been converted into a fermenting chamber with a temperature controller . 10 carboys fit inside this beast, with extra room for 6-packs and yeast slurries. With the temp controller, I can dial in the exact temps needed for any style of beer. The only trick to running a chest freezer at higher than freezing temps is moisture control. Since a freezer is unlike a refrigerator that controls moisture, you have to use something like Damp-Rid pellets. This is especially important in the humid summertime.
Once fermented and ready to drink, the beer is transferred into used 5 gallon "cornelius" soda kegs. If you've ever bottled a batch of beer, you'll know that cleaning all those bottles, paying more per batch with bottles and caps, having inconsistent carbonation levels and having to wait an extra 2-3 weeks for carbonation to take place sucks ass. With a lager style beer that has been aging at cool serving temperatures, I can keg a 10 gallon batch, force carbonate it and be drinking it within an hour.

There is also another component that came out of retirement from the depths of Dave Gray's dungeon basement. Originally passed onto him from the mighty Dan Cheever, this gem of a refrigerator already had the lineage of many drinking champions. It was an honor to have it serve beer for the rest of it's lifetime. All it took was gutting the drawers and shelves, drilling holes in the side of the door for three CO2 lines to go in, then three more holes on the front of the door for the beer faucets. It just happens to fit four 5-gallon kegs perfectly. Coming soon is the cupboard on top to house all the funky glassware and mugs we have.
I opted against the expensive stainless drip trays under the beer faucets in favor of the common toilet rug on the floor. The rugs are cheap as hell, do the job, don't collect fruit flies and can easily be thrown in the washing machine when dirty. I'm currently upgrading the old chrome-plated brass faucets and shanks with 100% stainless Ventmatic faucets and stainless shanks. All the old stuff will get used for my Xtracycle beer bike project that is happening this winter. More on that later. I also just scored a new digital temperature controller, so both the chest freezer/fermenter and the serving kegerator will be temp controlled. This not only saves energy by running it less, but also allows for proper serving and fermentation temperatures based on specific styles. The freezer inside the kegerator fridge serves as a place to store hops and cold packs.
 Perhaps the lamest part on this tour is that I can't pour you a sample of the goods to taste. They are always work in progress and I experiment too much to have good beers each time. In fact, I probably dump about 1 in 10 batches down the drain because they missed the mark, or I got carried away with the dark roasted malts, or the dry hopping just ruined the whole batch. The goal here is to have kickass beer, be environmentally responsible, be self sufficient and start getting back some of the money spent on the equipment by saving money over store bought beer. I estimate the average 10 gallon batch (that's 18 six-packs) of beer costs about $30-35 including ingredients, cleaning chemicals and propane. That's $1.66-$1.94 per six-pack, not too fucking bad!
If you're a do-it-yourselfer, stay tuned for a more detailed tour with the small features of the brewery. If I did this all over again, there are some things I'd do differently. It's only fair that this information is accessible, since alot of my ideas came from other homebrewers with websites to help us out.
A day of brewing usually begins by crushing the grain. Pictured below is the grain mill that is used to crack open the malted barley kernels. Proper cracking is essential for hot water to penetrate and extract the starches inside. Also, the outer husk acts as a filter in the 2nd brewing kettle, which I'll get into later. This grain mill was made with alot of recycled bike parts surrounding the Schmidling gear drive roller mill. Notice the legs are actually top tubes from blemished Surly Karate Monkey frames. The clamps holding the legs to the table platforms are Salsa stem clamps leftover from the destructive testing machine. The gold topcaps are Salsa quill stem parts, complete with titanium wedge bolts, oh yeah. The motor was sitting in Dave Gray's office and was brought out of retirement to serve as a brewing component. The motor runs at 1,700 r.p.m. but the optimum mill roller speed is about 200 r.p.m., so I geared it down using chainrings. Life could've been easier if I just used v-belts and sheaves like it was originally intended to run on, but fuck that. It's my brewery and it should look cool. Mounting the chainrings took some sacrificial other bike parts like used cranks and a bottom bracket. The only good use for wax-based chainlubes I've ever seen was for this grain mill, since the wax is alot less dirty and doesn't splatter up the table when in operation. The original grain hopper only held less than 2 pounds of grain at a time, so I built a new one that is twice the capacity. Since the very first day I ran this thing in 2002, it's run like a champ and hasn't needed one adjustment. Rock solid!
This is what the crushed barley looks like. You can also eat this stuff, as it tastes very much like Grape Nuts cereal.
The hop vines growing outside the brewing porch are of the Cascade and Willamette varieties. These had grown for 3 years in the original Swerve Brewery location before being transplanted to the new location in 2004. I have yet to use them in a batch of beer, but they look nice and provide a ton of shade during the summer months.

Inside the porch is where the brewing actually takes place. These kettles are used, refurbished and modified 1/2 barrel kegs purchased through Sabco with a 12" diameter hole cut in the top. The kegs actually make for excellent brewing vessels and I have yet to find a reason people spend tons of money on expensive new kettles.
This 3-tier design is very simple since the water flows via gravity, allowing freedom from having to use a pump. I eventually bought a pump to have liquid recirculating options and for speeding up the chilling process.
The upper most kettle is the hot liquor tank (HLT) and it's primary function is to heat the bulk of the water for the system.

The middle kettle is called the mash tun and it's primary uses are to cook the crushed malted barley like you would oatmeal. It is truly the heart of the whole system. The crushed malted barley is poured into specific temperature hot water. At certain temperatures between 120-170 F (48-77 C), the starches in the barley will be converted to sugars, proteins will be broken down and enzymes will be given the green light for fermentation assistance.
 After the water and/or ingredients in the upper and middle kettles are heated to the proper temperature, they must rest for specific times at these stable temperatures to either break down proteins, convert starches to sugars and a host of other geeky chemical reactions. To aid in temperature stabilization during these rest periods, I wrap the kettles with a heat blanket that is made from foiled covered bubble wrap. It's temp resistant to 180F and does a good job.
 Inside these kettles, you'll see a stainless steel screen. This is called a false bottom, because it supports the grain bed and allows the liquid to flow through the bottom and out the pick up tube to be transferred to another kettle. 2 of 4 ingredients are now present, water and malt.
The lowest kettle is the boiling kettle. When the sugary liquids from the mash tun have cooked through their cycle, they are drained here for a 90 minute boil. During the boil is when hops are added, so 3 of the 4 ingredients are now present. The longer hops are boiled, the more bitterness you'll sense. The shorter hops are boiled, the more flavor and aroma you'll taste and smell. Balancing the bitterness to flavor to aroma levels is the hard part. Both the mash tun (middle kettle) and the boil kettle (bottom) have identical false bottoms. This time it's used to hold back the hops when it's time to drain the liquid (now called wort) into the chiller.
It is absolutely necessary to cool the wort (pronounced wert) to optimum temperatures for fermentation to take place. Yeast likes starting temps in the 55-75 F (13-24 C) range and the easiest way for a homebrewer to cool 10 gallons of boiling wort down is with cold water or ice.
The "counterflow" wort chiller consists of a copper tube inside another copper tube. Hot wort flows into the inner tube while cold water flows through the outer tube. The cold water cools the wort down as they bypass eachother flowing in opposite directions. With help from the flow restricted pump and the built in temperature gage, I'm able to get the wort cooled to exactly the temperature desired for the specific yeast strain. This cooling process takes about 15 minutes and sanitation at this point is ultra critical. It takes alot of water to cool beer down, so I have a stainless steel tubing coil dipped in an ice bath (or snow in the winter) between the kitchen sink and the counterflow chiller. This speeds things up and allows less water usage. I also run the hose either back into the upper kettles for cleaning water or outside to the garden for the hops in the summer.

Notice the red oxygen tank inside the chiller, this pumps fresh oxygen back into the cooled wort. Oxygen is boiled out of the wort during the 90 minute boil and adding it back in is necessary for the yeast to have a healthy aerobic start.
The cooled and oxygenated wort is put in a fermenter and the yeast slurry is now pitched. All 4 ingredients in beer are now present, but the most wonderful thing is about to take place, fermentation. Imagine yeast, a fungus, is like a little Pacman. There are literally millions of these Pacmen flowing around, waking up from a nap and looking for something to eat. Simplifying the fermentation process, you could say the Pacmen eat the sugars and afterwards "urinate" alcohol and "fart" CO2. The alcohol stays in the beer while most of the CO2 is released through an escape tube on top of the fermenter. The majority of the fermentation takes place in the first 4-10 days, but the beer (formerly known as wort) must be aged to allow off flavors and smells to vanish, allow the yeast, proteins and gunk to settle to the bottom and for maturation of flavor. Depending on the style of beer made, this secondary fermentation stage can last from weeks to months.
The fermenters used are mainly 5-6.5 gallon glass carboys. The best thing about glass is that you can watch the fermentation activity during the peak of the first week. Have you ever seen a cascading Guinness stout in the glass? The activity of fermenting beer is similar looking, but even more active. When I ask professional brewers what they miss most about their early days of homebrewing, most of them say they miss watching the fermentation activity in the glass carboy.
 I also employ a more modern stainless steel conical shaped fermenter. This thing rocks and makes the cellaring practices many steps easier. With glass carboys, it is necessary to sanitarily transfer the beer off the bottom layer of settled scum after a couple weeks into 2 new carboys in order to clarify the beer. So for a 10 gallon batch, that is 4 carboys that have to be cleaned and sanitized along with all the transfer tubing and small pieces. With the conical, all you do is open up the bottom valve to allow about 1/2 gallon of the settled scum to flow out. This saves at least 45 minutes of time and uses less water and cleaning chemicals. Not to mention, you can easily recycle this scum, which is basically "sleeping" Pacmen and proteins, into another freshly brewed wort batch to wake them up and get a second life out of the yeast. I didn't construct this vessel myself, but I built the legs, attached casters for mobility and cinched them together at the bottom with used chainrings. The height allows for easy transfer of beer directly into the keg.
Fermentation takes place based upon the temperatures in the basement. The cellar ranges from 49-73 F (9-23 C) depending upon the seasons. I try to brew styles that cater to the natural temperatures from season to season. But when I'm craving a Munich Helles and it's July, there is also the massive chest freezer that's been converted into a fermenting chamber with a temperature controller . 10 carboys fit inside this beast, with extra room for 6-packs and yeast slurries. With the temp controller, I can dial in the exact temps needed for any style of beer. The only trick to running a chest freezer at higher than freezing temps is moisture control. Since a freezer is unlike a refrigerator that controls moisture, you have to use something like Damp-Rid pellets. This is especially important in the humid summertime.
Once fermented and ready to drink, the beer is transferred into used 5 gallon "cornelius" soda kegs. If you've ever bottled a batch of beer, you'll know that cleaning all those bottles, paying more per batch with bottles and caps, having inconsistent carbonation levels and having to wait an extra 2-3 weeks for carbonation to take place sucks ass. With a lager style beer that has been aging at cool serving temperatures, I can keg a 10 gallon batch, force carbonate it and be drinking it within an hour.
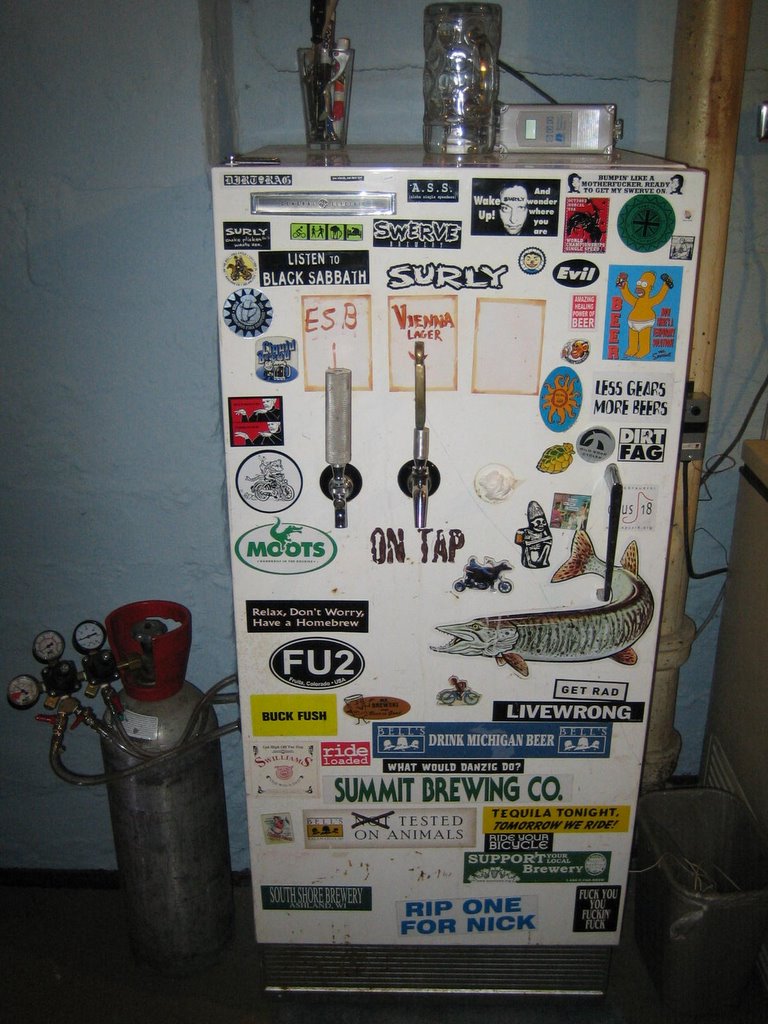
There is also another component that came out of retirement from the depths of Dave Gray's dungeon basement. Originally passed onto him from the mighty Dan Cheever, this gem of a refrigerator already had the lineage of many drinking champions. It was an honor to have it serve beer for the rest of it's lifetime. All it took was gutting the drawers and shelves, drilling holes in the side of the door for three CO2 lines to go in, then three more holes on the front of the door for the beer faucets. It just happens to fit four 5-gallon kegs perfectly. Coming soon is the cupboard on top to house all the funky glassware and mugs we have.
I opted against the expensive stainless drip trays under the beer faucets in favor of the common toilet rug on the floor. The rugs are cheap as hell, do the job, don't collect fruit flies and can easily be thrown in the washing machine when dirty. I'm currently upgrading the old chrome-plated brass faucets and shanks with 100% stainless Ventmatic faucets and stainless shanks. All the old stuff will get used for my Xtracycle beer bike project that is happening this winter. More on that later. I also just scored a new digital temperature controller, so both the chest freezer/fermenter and the serving kegerator will be temp controlled. This not only saves energy by running it less, but also allows for proper serving and fermentation temperatures based on specific styles. The freezer inside the kegerator fridge serves as a place to store hops and cold packs.
 Perhaps the lamest part on this tour is that I can't pour you a sample of the goods to taste. They are always work in progress and I experiment too much to have good beers each time. In fact, I probably dump about 1 in 10 batches down the drain because they missed the mark, or I got carried away with the dark roasted malts, or the dry hopping just ruined the whole batch. The goal here is to have kickass beer, be environmentally responsible, be self sufficient and start getting back some of the money spent on the equipment by saving money over store bought beer. I estimate the average 10 gallon batch (that's 18 six-packs) of beer costs about $30-35 including ingredients, cleaning chemicals and propane. That's $1.66-$1.94 per six-pack, not too fucking bad!
If you're a do-it-yourselfer, stay tuned for a more detailed tour with the small features of the brewery. If I did this all over again, there are some things I'd do differently. It's only fair that this information is accessible, since alot of my ideas came from other homebrewers with websites to help us out.
posted by Swervy at 8:06 PM
![]()
![]()


<< Home